
Dynamic Depth Photo · Gettysburg · 1863
Gettysburg Battle Maps
Read the ground. Follow the action. Understand the significance.
Three daily overviews using original National Park Service maps, with cited photograph connections for Little Round Top and Cemetery Ridge. These maps combine phases and show schematic positions; they are not exact, simultaneous troop surveys.
Day 1 · July 1, 1863
The fight reaches Gettysburg
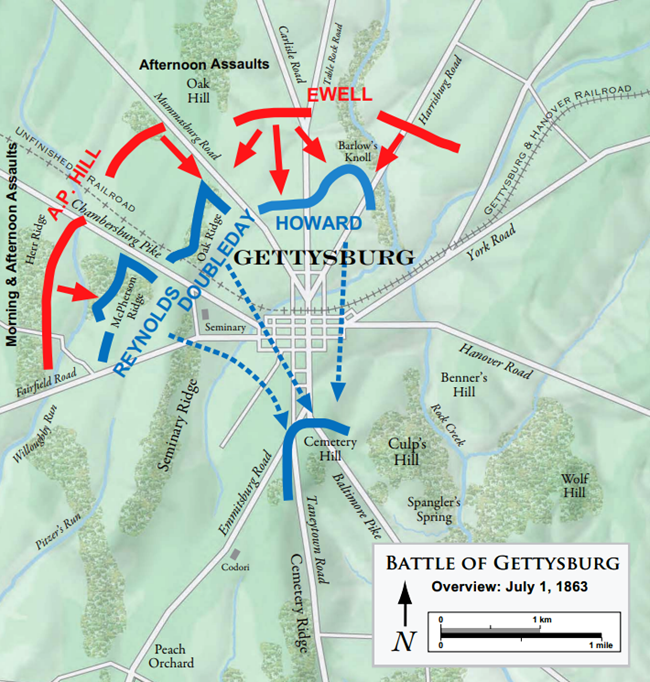
Approaches from the west and north
What happened
Confederate forces arriving from the west and north pushed Union troops back through Gettysburg. The map follows the fighting and retreat toward the high ground south of town. [1]
Why it mattered
Read the approaches and the retreat together: the ground south of town becomes the setting for the next day’s Union defensive line. [1]
From the photograph to the battle
Photographs of a memorial belong beside the relevant battle phase only after the commemorated person or unit’s action is verified. A modern monument location does not establish a wartime position.
Day 2 · July 2, 1863
Defending the fishhook
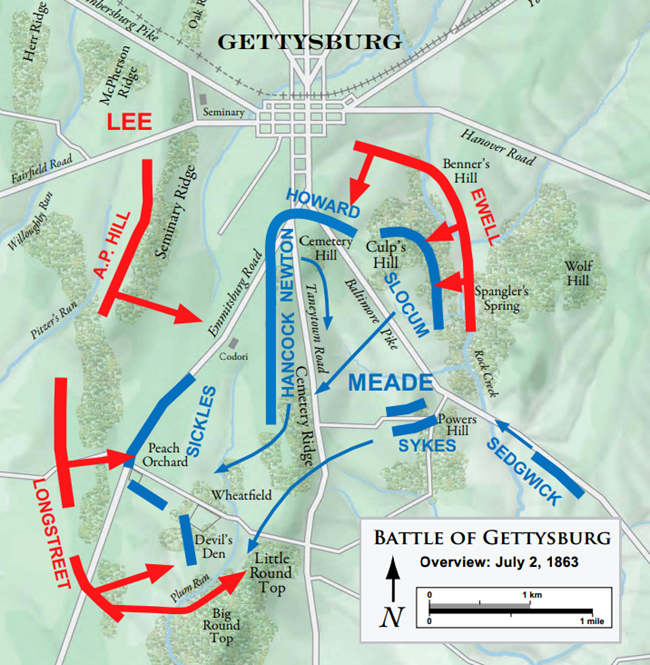
High ground and the Union flanks
What happened
The Union line linked Culp’s Hill, Cemetery Hill, Cemetery Ridge and Little Round Top. Confederate attacks struck both ends of this defensive fishhook; Union forces retained the principal heights, but lost forward positions at the Peach Orchard and part of the lower Culp’s Hill works. Confederates occupied those Culp’s Hill works overnight; Union troops recovered them on July 3. [1, 5, 7, 8, 9]
Why it mattered
Little Round Top mattered to the Union left. Warren recognized the approaching Confederate threat and called for reinforcements. Its observation and defensive value is explained in the NPS tour. [2, 4]
From the photograph to the battle
Warren’s monument photographs connect to this July 2 action: recognizing the danger and helping bring troops to Little Round Top. This overview does not locate Warren’s exact movements or each regiment’s position. [2, 4]
View James’s Warren photograph
[1] National Park Service: battle overview [2] National Park Service: Warren monument [4] National Park Service: Little Round Top tour
Day 3 · July 3, 1863
The assault on Cemetery Ridge
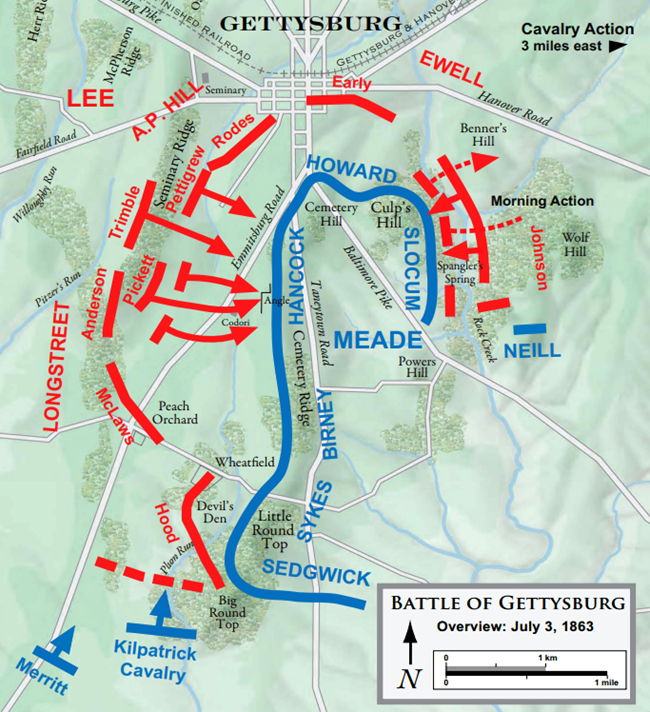
The Union center and the 72nd Pennsylvania
What happened
The assault commonly called Pickett’s Charge struck the Union center at Cemetery Ridge and was repulsed. This daily map also depicts morning action and points toward cavalry fighting east of the main field. [1]
Why it mattered
The 72nd Pennsylvania began in reserve behind Cemetery Ridge. It advanced to the crest, endured heavy fire, and later joined the advance to the stone wall as Confederate resistance collapsed. [3]
From the photograph to the battle
The 72nd Pennsylvania monument photograph connects to this defense. Its present monument near the wall must not be used as the regiment’s initial battle position. [3]
View James’s 72nd Pennsylvania photograph
[1] National Park Service: battle overview [3] National Park Service: 72nd Pennsylvania
Sources & reading the maps
- [1] National Park Service: battle overview
- [2] National Park Service: Warren monument
- [3] National Park Service: 72nd Pennsylvania
- [4] National Park Service: Little Round Top tour
- [5] Carol Reardon and Tom Vossler, U.S. Army Center of Military History: The Gettysburg Campaign (2013), pp. 45–48 for the July 2–3 discussion
- [6] National Park Service: ownership and reuse
- [7] Williams’s official report
- [8] Johnson’s official report
- [9] National Park Service: the Peach Orchard
A monument commemorates a person, unit or event. Its modern location may differ from a unit’s position during the battle. Use the dated battle phase and its evidence to interpret the photograph.
Original map geometry, labels, colors, scales and north arrows are retained. The blue/red key outside each map explains the source colors. The daily overview maps have not been changed. The separate Little Round Top foundation uses an original Warren terrain survey with broad area highlights; these annotations do not assert exact unit footprints or routes.
Next detail studies: Little Round Top on July 2 and Cemetery Ridge on July 3. Every added unit position or movement needs a source, a time or phase, and an appropriate statement of uncertainty.
Research reviewed October 3, 2026. Sources and map attribution rechecked October 4, 2026. Original maps credited NPS by the source page. No claim to original U.S. Government works. Independent interpretation; no NPS endorsement. Use the linked sources to distinguish documented events from schematic interpretation.